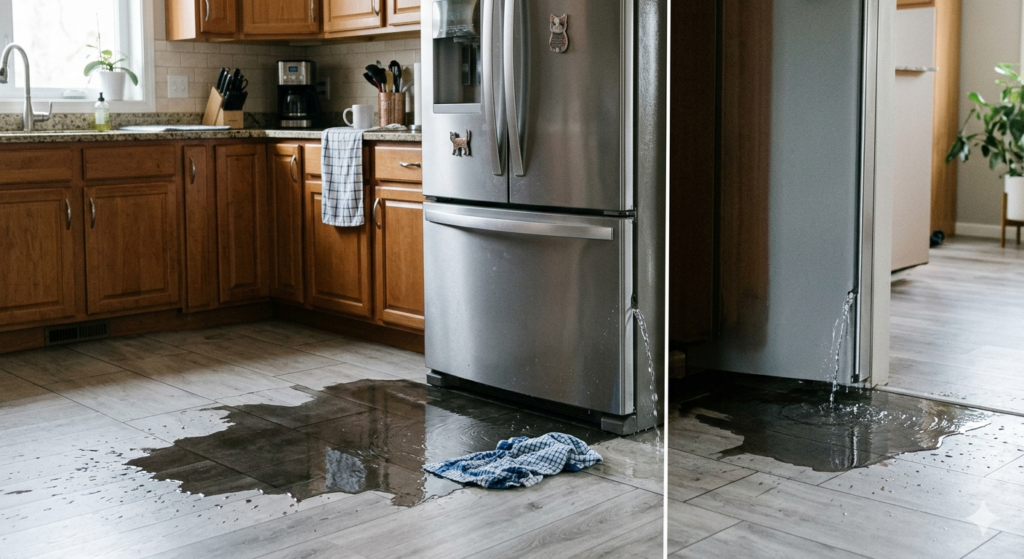
A refrigerator leaking water is one of those everyday problems that can catch you off guard. One minute everything seems fine, the next you’re stepping into a cold puddle on your kitchen floor. It’s not just annoying—it can damage flooring, encourage mold growth, and sometimes signal that your appliance is working harder than it should, which means higher energy bills. The good news is that most refrigerator leaks have straightforward causes and fixes you can handle yourself with a little patience and the right approach.
At Tech Angels, we help homeowners throughout Coquitlam and the surrounding areas repair appliances just like this every week. Our team at tech-angels.ca has seen every type of fridge leak imaginable, from slow drips to sudden floods. In this guide, we’ll walk you through the most common reasons refrigerators leak, how to pinpoint the source, and practical step-by-step solutions. Whether you’re comfortable with basic tools or just want to know what to check before calling a technician, this article will help you get your fridge back to normal.
Why Is My Refrigerator Leaking Water?
Understanding the root cause is the first step to fixing any leak. Water can appear in different places—inside the fresh food compartment, under the crisper drawers, behind the appliance, or directly on the floor—and each location points to a different issue.
The most frequent culprit is a clogged defrost drain. Frost-free refrigerators run automatic defrost cycles to melt frost buildup on the evaporator coils. That meltwater is supposed to flow through a small drain hole at the back of the freezer (or sometimes the refrigerator section), travel down a tube, and collect in an evaporation pan underneath the fridge where it eventually evaporates. Over time, bits of food, dust, grease, or even mold can block this drain. When that happens, water backs up and spills out inside the compartment or leaks onto the floor.
Another very common cause involves the water supply line if your refrigerator has an ice maker or water dispenser. The flexible plastic or copper line that connects your home’s water supply to the fridge can develop small cracks, become loose at the fittings, or get pinched behind the appliance. Even a tiny leak here can create a steady drip that pools underneath or behind the unit.
The drain pan (also called the drip pan or evaporation tray) sits under the refrigerator and catches defrost water. If this pan cracks, rusts through, or becomes misaligned, water escapes instead of evaporating. This is more likely in older models or in homes with high humidity.
An unlevel refrigerator can also cause problems. Most fridges are designed to sit slightly tilted toward the back so doors close easily and any internal condensation flows toward the drain. If the appliance is perfectly level or tilts forward, water may not drain properly and can leak out the front or sides.
Worn or dirty door gaskets let warm, humid air enter the fridge, leading to excessive condensation. That extra moisture condenses on cold surfaces, drips down, and eventually escapes as a leak. You might notice frost buildup, wet spots inside, or water near the doors.
Less common issues include a faulty water inlet valve (which can fail to shut off completely), a loose or improperly seated water filter, or even overpacking the freezer so air can’t circulate properly, causing abnormal frost and defrost problems.
Quick tip: note where the water is appearing and when it happens (after dispensing water, during/after a defrost cycle, constantly, etc.). That observation usually tells you exactly where to start looking.
If you’re not sure what you’re seeing or the problem keeps coming back, our Coquitlam-based technicians at Tech Angels are happy to help. You can reach us anytime through tech-angels.ca for fast, reliable service in your neighborhood.
Tools and Supplies You’ll Need
You don’t need a full workshop to tackle most refrigerator leaks. Gather these items before you start:
- Phillips and flathead screwdrivers
- Adjustable wrench or pliers
- A flashlight
- Bucket and plenty of old towels
- Pipe cleaners, a long flexible wire, or a turkey baster
- Warm water and mild dish soap
- Baking soda (optional, for cleaning stubborn clogs)
- A small level
- Replacement parts if needed (water line, filter, gasket, drain pan—match your exact model number)
Find your refrigerator’s model number on a label inside the fresh food section (usually on the wall near the top or along the door frame). Having that number makes it much easier to order the correct replacement parts if you need them.
Before you begin any repair, unplug the refrigerator and—if it has a water line—turn off the water supply valve (often located under the sink or behind the fridge). This keeps you safe and prevents accidental flooding while you work.
Step-by-Step Troubleshooting and Repairs
Here’s how to address the most common leak causes, starting with the easiest and most frequent fixes.
1. Clear a Clogged Defrost Drain
This fix solves more leaks than any other single repair.
- Unplug the refrigerator and remove food from the freezer if necessary.
- Locate the defrost drain hole—usually a small opening at the back wall of the freezer compartment, near the bottom, sometimes hidden behind a panel or under the evaporator cover.
- Fill a turkey baster or syringe with hot (not boiling) water and gently flush the drain several times.
- If water doesn’t flow through to the drip pan underneath, use a pipe cleaner or flexible wire to carefully probe and break up the clog. Move slowly to avoid damaging the plastic tube.
- Flush again with a mixture of warm water and a little baking soda if you suspect mold or grease buildup.
- Once water flows freely, dry the area, reassemble any panels, plug the fridge back in, and monitor for the next few hours.
Many people find that repeating this flush every six to twelve months prevents future clogs.
2. Inspect and Repair the Water Supply Line
If the leak appears behind or under the fridge and your model has an ice maker or dispenser:
- Turn off the water supply at the shut-off valve.
- Pull the refrigerator away from the wall (get help—it’s heavy).
- Check the entire length of the water line for cracks, kinks, or wet spots.
- Tighten any loose compression nuts at the fridge end and at the wall valve.
- If the line is damaged, replace it. Plastic tubing kits are inexpensive and simple to install—just cut to length and push into quick-connect fittings.
- Turn the water back on slowly and watch for leaks. Run a few cycles of the dispenser to flush the line.
If the leak is at the water inlet valve itself (the part mounted inside the back of the fridge), that usually requires more advanced repair. Feel free to contact Tech Angels via tech-angels.ca for expert assistance.
3. Check and Clean the Drain Pan
- Remove the lower front kick panel or access the pan from the back, depending on your model.
- Slide out the pan and empty any standing water.
- Wash it thoroughly with warm soapy water.
- Inspect for cracks or rust holes. If damaged, replace it with an OEM part.
- While the pan is out, vacuum dust from the condenser coils to help the fridge run more efficiently.
A clean pan and coils mean better evaporation and fewer overflow problems.
4. Level the Refrigerator
- Place a small level on top of the fridge (remove any items first).
- Check side-to-side and front-to-back.
- Adjust the front leveling feet (usually by turning them with a screwdriver or wrench) until the bubble is centered side-to-side and the fridge tilts slightly backward (about 1/4 inch lower in the rear).
- Test door closure—both doors should swing shut gently on their own.
Proper leveling helps internal moisture flow toward the drain instead of pooling.
5. Inspect and Clean Door Gaskets
- Wipe the rubber gaskets with warm soapy water and a soft cloth. Remove any food residue or stickiness.
- Check for tears, cracks, or areas that no longer make full contact.
- Perform the dollar-bill test: close a bill in the door at several spots. If it pulls out easily, the gasket needs replacement.
- New gaskets are usually available online or through appliance parts suppliers—just match your model number.
Clean, tight seals reduce excess condensation and prevent many minor leaks.
When to Call a Professional
Some issues go beyond basic DIY:
- Electrical components (water inlet valve, defrost thermostat, heater) are involved
- The leak continues after clearing the drain and checking the water line
- You notice strange noises, poor cooling, or frost buildup along with the leak
- You’re uncomfortable moving a heavy appliance or working near electrical parts
At Tech Angels, we specialize in fast, honest refrigerator repairs right here in Coquitlam and nearby neighborhoods. Our technicians arrive equipped to diagnose and fix leaks the same day in most cases. Visit tech-angels.ca to book an appointment or get advice tailored to your specific model.
Preventing Future Leaks
Once you’ve fixed the problem, a few habits keep it from coming back:
- Flush the defrost drain every six to twelve months.
- Replace the water filter on schedule (usually every six months).
- Keep the fridge and freezer reasonably organized so air circulates freely.
- Clean condenser coils yearly.
- Check the water line and fittings during routine cleaning.
- Monitor for small drips—catching them early prevents bigger damage.
A little preventive care goes a long way toward keeping your refrigerator leak-free and running efficiently for years.
We hope this guide helps you solve your refrigerator leak quickly and confidently. If you run into trouble or just want a second pair of eyes, the team at Tech Angels is always here to assist homeowners across Coquitlam. Check us out at tech-angels.ca—we’re your local appliance repair experts.