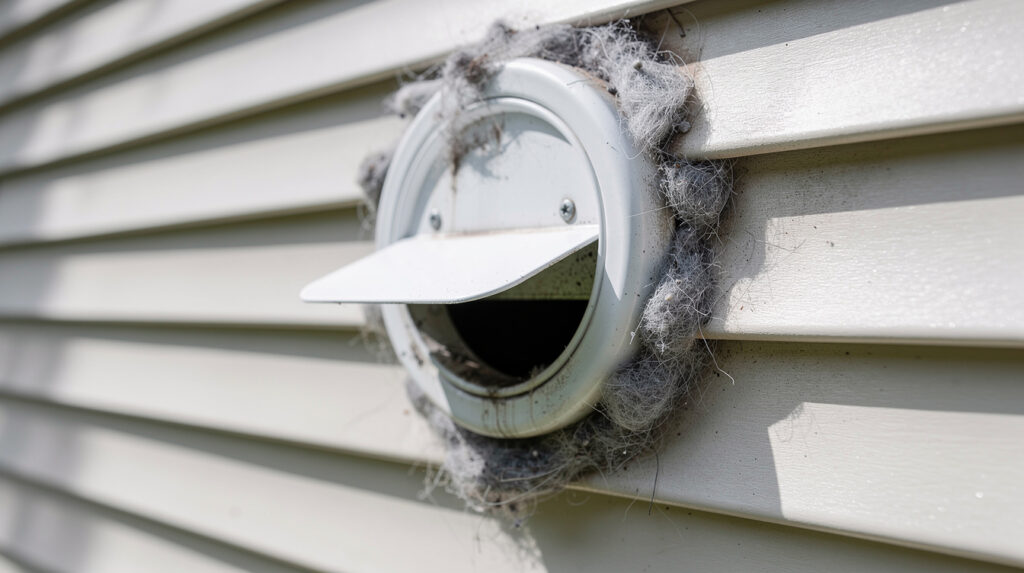
Why Dryer Vent Blockages Are More Dangerous Than You Think
Your dryer is one of the hardest-working appliances in your home, and it relies on a clear, unobstructed vent to function safely and efficiently. Every time you run a load, hot, moist air is pushed through the vent system and expelled outside. When that vent becomes blocked — whether partially or completely — the consequences can range from annoying to genuinely dangerous.
According to fire safety authorities across Canada, dryer vent blockages are one of the leading causes of residential fires. The lint that accumulates in and around your dryer is highly flammable, and when it combines with the heat generated during a drying cycle, the conditions for ignition are all there. The good news is that preventing dryer vent blockages is entirely within your control, and it does not take much effort if you stay on top of it.
In this guide, we will cover everything you need to know about keeping your dryer vent clear, recognizing the warning signs of a blockage, and taking the steps that will significantly reduce the risk of a dryer fire in your home.
How Your Dryer Vent System Works
Before we get into prevention, it helps to understand what your dryer vent system actually does. When your dryer heats your clothes, it produces large amounts of hot, humid air. This air needs somewhere to go — it is pushed through a duct that runs from the back of the dryer, through the wall or floor, and out to an exterior vent on the side of your house.
Components of the Vent System
- Lint trap or lint screen: The first line of defense, located inside the dryer door or on top of the dryer. It catches the bulk of the lint from each load.
- Transition duct: The short, flexible section that connects the back of your dryer to the rigid ductwork in the wall. This is often a corrugated foil or semi-rigid aluminum duct.
- Main duct: The rigid or semi-rigid duct that runs through your wall, floor, or ceiling to the exterior vent.
- Exterior vent cap: The flap or louvered cover on the outside of your home where the air exits. It is designed to open when the dryer is running and close when it is not, to prevent pests and weather from entering.
Lint can accumulate at any point in this system, but the most problematic areas are the transition duct, any bends or elbows in the main duct, and the exterior vent cap. If you have noticed your dryer taking much longer than usual to dry clothes, a vent blockage is one of the first things to investigate.
The Real Dangers of a Blocked Dryer Vent
A clogged dryer vent is not just an inconvenience — it is a safety hazard that affects multiple aspects of your home and health.
Fire Risk
This is the most serious danger. Lint is extremely flammable. When it accumulates in the vent duct and is exposed to the high temperatures of the dryer’s exhaust, it can ignite. The fire can spread rapidly through the ductwork and into the walls of your home. Dryer fires can cause extensive property damage, injuries, and in the worst cases, fatalities.
The risk increases significantly with longer vent runs, vents with multiple bends, and vents that have not been cleaned in over a year. If you want to learn more about how to maintain your dryer to prevent fire hazards, our guide on dryer maintenance and fire prevention covers the topic in detail.
Carbon Monoxide Exposure
If you have a gas dryer, a blocked vent can prevent the proper exhaustion of combustion byproducts, including carbon monoxide. This odourless, colourless gas can build up in your laundry room and spread through your home, posing a serious health risk. Always ensure your gas dryer vent is clear and that you have a working carbon monoxide detector near your laundry area.
Increased Energy Costs
When the vent is blocked, your dryer cannot expel moisture efficiently. This means each load takes longer to dry, and your dryer runs additional cycles to get the job done. The extra runtime translates directly into higher electricity or gas bills. Over a year, a partially blocked vent can add a noticeable amount to your utility costs.
Premature Appliance Wear
A dryer that is constantly working against a restricted vent is under significant mechanical stress. The heating element, motor, and other internal components are forced to work harder and run longer, which accelerates wear and can lead to premature breakdowns and expensive repairs.
Moisture and Mold Problems
If the humid air from the dryer cannot escape through the vent, it has to go somewhere. It may back up into the laundry room, raising humidity levels and creating conditions that promote mold and mildew growth on walls, ceilings, and nearby surfaces. In Vancouver’s already damp climate, this added moisture can be particularly problematic.
Warning Signs Your Dryer Vent May Be Blocked
Catching a vent blockage early is key to preventing the dangers listed above. Here are the telltale signs to watch for:
- Clothes take longer than one cycle to dry. If a standard load that used to take 45 minutes now takes 90 minutes or more, airflow is likely restricted.
- Clothes are unusually hot to the touch at the end of a cycle, and the dryer itself feels excessively hot on the outside.
- The laundry room feels humid or damp when the dryer is running.
- You notice a burning smell during or after a drying cycle. This is a serious warning sign — stop using the dryer immediately and inspect the vent.
- The exterior vent flap does not open when the dryer is running, or it opens only slightly.
- Lint is accumulating around the dryer in unusual amounts, or you see lint on the back of the dryer or around the vent connection.
- The dryer shuts off before the cycle is complete. Many modern dryers have a thermal safety switch that cuts power when overheating is detected.
If you have noticed any of these warning signs of a hot dryer vent, take action promptly. The longer you wait, the greater the risk.
How to Clean Your Dryer Vent: Step-by-Step
Cleaning your dryer vent is a task most homeowners can handle with basic tools. Aim to do it at least once a year — more often if you do a lot of laundry or have a longer vent run.
Tools You Will Need
- A dryer vent cleaning brush kit (long flexible brush with extensions — available at most hardware stores for around $25 to $40)
- A vacuum cleaner with a hose attachment
- A screwdriver (to loosen the hose clamp on the transition duct)
- A flashlight
- Work gloves
Step 1: Disconnect the Dryer
Unplug the dryer from the electrical outlet. If you have a gas dryer, turn off the gas supply valve behind the dryer. Carefully pull the dryer away from the wall to access the back.
Step 2: Disconnect the Transition Duct
Loosen the hose clamp that connects the transition duct to the dryer exhaust port. Gently pull the duct away from the dryer. Be careful with flexible foil ducts — they tear easily.
Step 3: Clean From the Inside
Insert the dryer vent brush into the duct opening in the wall. Push it as far as it will go, rotating the brush as you push and pull it back. Repeat several times until very little lint is coming out. Use the vacuum to clean up the lint that falls out.
Step 4: Clean From the Outside
Go outside and remove the exterior vent cap if possible. Insert the brush from the outside end and work it back through the duct. This helps dislodge lint that may be packed near the exterior opening, which is a common trouble spot.
Step 5: Clean the Transition Duct and Dryer Exhaust Port
Clean out any lint from inside the transition duct itself. Also vacuum the dryer exhaust port — the opening on the back of the dryer where the duct connects. You will likely find a surprising amount of lint here.
Step 6: Reassemble and Test
Reattach the transition duct to the dryer, tighten the hose clamp, and push the dryer back into position. Make sure the transition duct is not crushed or kinked behind the dryer — this is a very common cause of restricted airflow. Plug the dryer back in (and turn the gas back on if applicable), then run the dryer on the air-dry or fluff setting for a few minutes. Go outside and check that air is flowing freely from the exterior vent.
Best Practices for Preventing Vent Blockages
Regular cleaning is the most important thing you can do, but there are several other practices that will help keep your vent system clear and reduce fire risk.
Clean the Lint Trap Before Every Load
This is the simplest and most effective habit you can develop. Removing lint from the lint screen before every load prevents excess lint from entering the vent system. It also improves drying efficiency and reduces energy consumption.
Wash the Lint Screen Monthly
Even if you clean the lint trap before each load, dryer sheets and fabric softeners can leave a waxy residue on the screen that reduces airflow. Once a month, wash the lint screen with warm, soapy water and a soft brush, then let it dry completely before reinserting it.
Use Rigid or Semi-Rigid Metal Ductwork
If your dryer is connected with a flexible foil or plastic transition duct, consider upgrading to a semi-rigid aluminum duct. Flexible foil ducts have ridges that trap lint and can sag, creating low spots where lint accumulates. Semi-rigid or rigid metal ducts have smoother interiors and are much less likely to develop blockages. Plastic ducts are a fire hazard and should be replaced immediately.
Keep the Vent Run as Short and Straight as Possible
Every bend or elbow in the vent duct reduces airflow and creates a spot where lint can accumulate. The ideal setup is a short, straight run from the dryer to the exterior wall. If your laundry room is in the centre of the house, the vent run may be long and have multiple turns — in that case, you will need to clean it more frequently.
Make Sure the Exterior Vent Is Clear
Check the exterior vent cap regularly. Make sure it is not blocked by debris, snow, ice, leaves, or bird nests. The flap should move freely and open when the dryer is running. If your vent cap has a screen or cage, remove it — these trap lint and create blockages. A simple flap-style cap is the safest option.
Do Not Overload the Dryer
Overloading your dryer does more than just wrinkle your clothes. It produces more lint per load and puts additional strain on the dryer, which generates more heat and pushes more lint into the vent system. Dry loads that are the size recommended in your owner’s manual for best results.
Avoid Running the Dryer When You Are Away or Asleep
If a dryer fire starts while you are home and awake, you can respond quickly. If it starts while you are out or sleeping, the consequences can be far worse. As a general safety practice, only run the dryer when someone is home and alert.
When to Call a Professional for Dryer Vent Cleaning
While annual DIY cleaning is effective for most setups, some situations benefit from professional attention:
- Your vent run is longer than 25 feet or has more than two 90-degree elbows. Professional-grade equipment can clean longer, more complex runs more thoroughly than a consumer brush kit.
- You suspect a blockage deep in the duct that your brush cannot reach.
- The exterior vent is on the roof. Roof-mounted vents are harder to access and clean, and working on a roof carries its own risks.
- You have noticed any of the warning signs listed earlier, especially a burning smell or the dryer shutting off mid-cycle.
- It has been more than two years since the vent was last cleaned, or you have no idea if it has ever been cleaned.
A professional dryer vent cleaning typically costs between $100 and $200 in the Vancouver area and takes about an hour. It is a small investment compared to the cost of a dryer fire or a prematurely worn-out dryer. The team at Tech Angels can inspect your dryer vent system, clear any blockages, and advise you on any issues with your ductwork setup.
Upgrading Your Vent System for Better Safety
If your home has an older dryer vent system, there are a few upgrades worth considering that can improve both safety and efficiency.
Replace Plastic or Foil Ducts With Metal
As mentioned earlier, rigid or semi-rigid aluminum is the safest duct material. If your current duct is plastic or thin foil, replacing it is one of the most impactful upgrades you can make.
Install a Dryer Vent Alarm
Dryer vent alarms or lint sensors monitor airflow through the vent and alert you when airflow drops below a safe level. They are inexpensive — typically $20 to $40 — and provide an early warning that your vent needs attention.
Consider a Vent Booster Fan
If your vent run is long and you cannot relocate the dryer, a vent booster fan installed in the duct can help maintain adequate airflow. These fans sense when the dryer is running and automatically boost the air movement through the duct. They are especially useful in apartments and condominiums where the vent path is dictated by the building layout.
Switch to a Recessed Dryer Vent Box
The standard setup has the dryer pushed close to the wall with the transition duct compressed behind it. A recessed vent box installs into the wall and provides a connection point that sits flush, allowing you to push the dryer closer to the wall without crushing the duct. This eliminates a common airflow restriction and reduces lint buildup.
A Simple Maintenance Schedule
Here is a straightforward schedule to keep your dryer vent system in good shape:
- Before every load: Clean the lint trap.
- Monthly: Wash the lint screen with soap and water. Check behind the dryer for lint accumulation.
- Quarterly: Inspect the exterior vent cap. Clear any obstructions and make sure the flap moves freely.
- Annually: Perform a full vent cleaning from the dryer to the exterior vent using a brush kit, or hire a professional.
- Every five years: Have a professional inspect the entire vent system, including the transition duct and all connections, for wear, damage, or code compliance issues.
Final Thoughts
Dryer vent maintenance is one of those tasks that is easy to forget about — until something goes wrong. By staying on top of regular cleaning, watching for warning signs, and making a few simple upgrades to your vent system, you can dramatically reduce the risk of a dryer fire and keep your dryer running efficiently for years to come.
If it has been a while since your dryer vent was last cleaned, or if you have noticed any of the warning signs discussed in this article, do not put it off. A clean vent is a safe vent — and a little preventive maintenance goes a long way toward protecting your home and family.