When Your Oven Door Won’t Close: What’s Going On?
An oven door that won’t close properly is more than just an annoyance — it’s a safety concern and an energy waster. When the door doesn’t seal tightly, heat escapes, your food cooks unevenly, and your energy bills climb. In some cases, a poorly sealed oven door can even pose a burn risk, especially in households with curious kids or pets.
Whether your oven door won’t close at all, closes but doesn’t seal, or keeps popping open during cooking, there are several potential causes — and many of them are fixable without needing to buy a new oven. In this guide, we’ll walk through the most common reasons an oven door won’t close properly and how to fix each one.
Common Reasons Your Oven Door Won’t Close Properly
Understanding why your oven door won’t close is the first step toward fixing it. Here are the most frequent culprits, from the simplest to the more involved.
1. Worn or Damaged Door Hinges
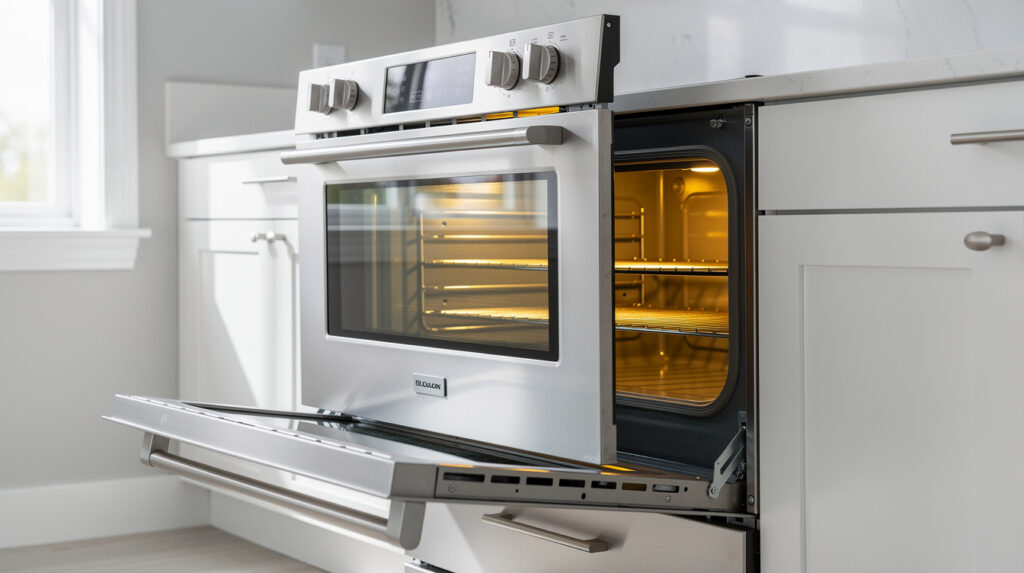
Oven door hinges are the workhorses of the door mechanism. They’re spring-loaded to hold the door at any angle and support its considerable weight. Over time, these springs can weaken, break, or become misaligned, causing the door to hang at an odd angle or fail to close completely.
Signs of hinge problems include a door that sags on one side, feels loose when you move it, or doesn’t stay in position when partially opened. If the door drops suddenly when you open it or slams shut on its own, the hinge springs are likely failing.
2. Broken or Bent Hinge Arms
The hinge arms are the metal pieces that extend from the oven frame into the door. If one of these arms is bent — often from forcing the door open or closed — it can prevent the door from aligning properly with the oven frame. A bent hinge arm is often visible if you look carefully at the hinge mechanism with the door open.
3. Worn Door Gasket (Seal)
The door gasket is the soft, flexible seal that runs around the perimeter of the oven door (or the oven frame, depending on the model). Its job is to create an airtight seal when the door is closed, keeping heat inside the oven.
Over time, the gasket can become brittle, compressed, torn, or caked with grease and food residue. A worn gasket may allow the door to close but fail to create a proper seal — you might feel warm air leaking from around the door, or notice that your oven takes longer to preheat and doesn’t maintain temperature well.
4. Door Latch Problems
Many modern ovens, especially those with a self-cleaning feature, have a door latch mechanism. If this latch is stuck in the locked position (which sometimes happens after a self-cleaning cycle), the door may not close properly during normal use. A malfunctioning latch can also prevent the door from latching securely when it does close.
If your oven has been acting up beyond just the door, check out our guide on what to do when your oven won’t turn on — some of these issues can be related.
5. Misaligned Door
An oven door can become misaligned from its frame due to loose screws, worn hinge slots, or physical impact. When the door is misaligned, it may appear to close but leaves a visible gap on one side, or it may resist closing entirely because it’s hitting the frame at the wrong angle.
6. Warped Door or Frame
Extreme heat exposure over many years can occasionally cause the oven door or the oven frame itself to warp slightly. This is more common in older ovens or those that have been subjected to unusually high temperatures. A warped door or frame can make it impossible to achieve a tight seal, even with new hinges and a new gasket.
7. Debris or Obstructions
Sometimes the simplest explanation is the right one. Food spills, grease buildup, or debris around the door seal area or hinge mechanism can physically prevent the door from closing. A thorough cleaning can sometimes solve what seems like a mechanical problem.
How to Diagnose the Problem
Before you start replacing parts, take a few minutes to identify exactly what’s wrong. This will save you time, money, and unnecessary trips to the hardware store.
Visual Inspection
Start by carefully examining the door with the oven turned off and cooled down completely. Open the door fully and look at the hinges on both sides. Are they symmetrical? Does one side look bent, broken, or different from the other? Check the hinge springs — are they intact and properly connected?
Next, examine the gasket all the way around the door. Feel it with your fingers — it should be soft, pliable, and continuous with no gaps, tears, or hard spots. If the gasket feels brittle or comes apart when you touch it, it needs replacing.
The Paper Test
To check if your door is sealing properly, try the paper test. Close the oven door on a piece of paper or a dollar bill. If you can pull the paper out easily without resistance, the seal isn’t tight enough in that spot. Test multiple points around the door to identify where the seal is failing.
The Heat Test
Turn the oven on to a moderate temperature (around 350 degrees Fahrenheit) and carefully hold your hand near (not touching) the door seam. If you feel significant heat escaping, there’s a seal problem. You might also notice the kitchen getting unusually warm during oven use — another sign of a poor seal.
Step-by-Step Fixes for an Oven Door That Won’t Close
Now let’s get into the solutions. We’ll start with the easiest fixes and work up to more involved repairs.
Fix 1: Clean the Door and Hinges
Before you replace anything, give the door area a thorough cleaning. Grease and food buildup around the hinges and gasket can interfere with the door’s operation.
- Make sure the oven is completely cool and unplugged (or turned off at the breaker for electric ovens).
- Use a mixture of warm water and mild dish soap to clean around the door frame, gasket, and hinge areas.
- For stubborn grease buildup, a paste of baking soda and water works well. Apply it, let it sit for 15 to 20 minutes, then wipe clean.
- Avoid using harsh chemical oven cleaners on the gasket, as they can damage it.
- Clean the hinge slots carefully, removing any debris that might be preventing smooth operation.
For a deeper clean, you might want to read our guide on how to deep clean your oven without chemicals — it covers the entire oven interior as well.
Fix 2: Replace the Door Gasket
If the gasket is worn, replacing it is one of the most straightforward oven repairs you can do. Door gaskets are usually held in place by hooks, clips, or screws, depending on the model.
- Order the correct replacement gasket for your oven model. Check your owner’s manual or the model number plate (usually inside the door frame) for the exact part number.
- Remove the old gasket by unhooking it from its clips or removing the screws that hold it in place. Work your way around the entire perimeter.
- Clean the channel or mounting surface where the gasket sits.
- Install the new gasket, starting at the top of the door and working your way down both sides, then across the bottom. Make sure it sits flat and evenly without any twists or bunching.
- Close the door and check for a snug, even seal all the way around.
A new gasket typically costs between $20 and $60, depending on the oven brand and model, making this one of the most affordable oven repairs.
Fix 3: Repair or Replace the Hinges
Hinge replacement is a bit more involved but still manageable for most handy homeowners. The exact process varies by oven type, but here’s the general approach.
For ovens with removable doors:
- Open the door to the broil position (partially open, where the hinges lock).
- Locate the hinge locks — small tabs or clips near each hinge. Flip them to the locked position.
- Grip the door firmly on both sides and lift it up and away from the oven. Oven doors are heavier than they look, so be careful.
- With the door removed, you can access the hinges more easily. Remove the damaged hinge and replace it with the new one.
- Reinstall the door by inserting the hinge arms into the hinge slots, then unlocking the hinge locks.
For ovens with non-removable doors:
Some ovens require you to remove the bottom panel or side panels to access the hinges. Consult your owner’s manual for model-specific instructions. If you’re not comfortable disassembling the oven, this is a repair best left to a professional.
Fix 4: Realign the Door
If the door is misaligned but the hinges are intact, you may be able to realign it by adjusting the hinge slots or tightening loose screws.
- Open the door and inspect the screws that attach the hinges to the oven frame and the door. Tighten any that are loose.
- If the hinge slots are worn or elongated, you may need to use slightly larger screws or add shims to get a snug fit.
- Close the door and check the alignment. The door should sit flush against the oven frame with an even gap all around.
Fix 5: Reset a Stuck Self-Cleaning Latch
If the self-cleaning latch is stuck, try these steps:
- Turn off the oven and let it cool completely.
- Try running the self-cleaning cycle again briefly (a few minutes), then cancel it. This can sometimes reset the latch mechanism.
- If that doesn’t work, unplug the oven for five minutes, then plug it back in. This resets the electronic controls.
- If the latch is physically stuck, you may need to manually release it. Some models have an access point behind the back panel or under the top panel. Consult your owner’s manual or look up your specific model online.
If your oven is showing error codes along with the door problem, the control board may be involved and a professional diagnosis might be needed.
How a Poorly Sealed Oven Door Affects Your Cooking
You might be tempted to ignore a door that’s “mostly” closing, but even a small gap can have significant effects on your cooking results.
Uneven Cooking
When hot air escapes from one side of the oven, the temperature inside becomes uneven. Foods closest to the gap may undercook while those on the opposite side overcook. This is especially noticeable when baking, where precise, consistent heat is essential for cakes, breads, and pastries to rise properly.
Longer Cooking Times
A leaking door forces the oven to work harder to maintain the set temperature. The heating element cycles on more frequently, leading to longer preheat times and extended cooking times for everything you prepare.
Higher Energy Bills
All that extra heating element cycling adds up on your electricity or gas bill. A properly sealed oven door can make a meaningful difference in energy consumption, especially if you use your oven frequently.
Safety Concerns
Hot air escaping from around the door raises the temperature of the oven’s exterior surfaces, the surrounding cabinetry, and the kitchen itself. This increases the risk of burns, particularly for children who may touch the oven while it’s in use. In extreme cases, sustained heat leakage can even damage nearby cabinetry or countertops.
When to Call a Professional
While many oven door problems are DIY-friendly, some situations call for professional help.
- The door or frame is visibly warped: A warped door can’t be fixed with new hinges or gaskets. A technician can determine whether the door or frame can be straightened or needs replacement.
- The self-cleaning latch won’t release: If you’ve tried the reset methods above without success, forcing the latch can cause damage. A technician can release it safely.
- You need to access internal components: If the repair requires removing oven panels to access hinges, latches, or electrical connections, and you’re not comfortable with this level of work, it’s best handled by a pro.
- The oven shows error codes related to the door: Electronic error codes can indicate issues with the door lock motor, temperature sensors, or control board — all of which require professional diagnosis.
- Gas oven concerns: If you have a gas oven and the door seal issue is accompanied by a gas smell, turn off the oven immediately and call a professional. Do not attempt DIY repairs on gas appliances if there’s any possibility of a gas leak.
For homeowners in the Vancouver area, Tech Angels specializes in oven repairs of all types. Whether it’s a stubborn latch, worn hinges, or a more complex issue, our technicians can diagnose and fix the problem efficiently.
Preventing Oven Door Problems
A little preventive care can extend the life of your oven door components and help you avoid problems down the road.
- Open and close the door gently: Slamming the oven door puts unnecessary stress on the hinges and springs. Close it firmly but not forcefully.
- Don’t lean or sit on the door: An open oven door might look like a convenient shelf, but oven doors aren’t designed to support weight. Leaning on the door can bend the hinges and damage the springs.
- Clean spills promptly: Food and grease that drip onto the door gasket or hinge area should be cleaned up as soon as the oven cools. Baked-on residue is much harder to remove and can damage the gasket over time.
- Inspect the gasket periodically: Every few months, take a moment to feel the gasket around the door. If it’s getting hard, cracked, or no longer springy, plan to replace it soon.
- Lubricate hinges if needed: Some oven hinges benefit from a light application of high-temperature silicone lubricant. Check your owner’s manual for recommendations specific to your model.
- Use self-cleaning sparingly: The extreme heat of a self-cleaning cycle (often above 800 degrees Fahrenheit) can accelerate wear on the gasket, hinges, and latch mechanism. Use it only when truly needed rather than as a regular cleaning method.
Cost of Oven Door Repairs
Here’s a general overview of what common oven door repairs cost:
- Door gasket replacement: $20 to $60 for the part. Professional installation adds $80 to $150 in labor.
- Hinge replacement: $30 to $100 per hinge for the part. Professional repair typically costs $150 to $300 total.
- Door latch repair or replacement: $30 to $80 for the part. Professional repair usually runs $120 to $250.
- Complete door replacement: $100 to $500 or more for the door assembly, depending on the brand. With installation, expect $200 to $700.
- Door glass replacement: If the inner or outer door glass is cracked (which can also prevent proper closing), replacement glass costs $50 to $200 with professional installation running $150 to $350.
In most cases, repairing an oven door is significantly cheaper than replacing the entire oven, which can cost $700 to $3,000 or more for a quality unit.
Final Thoughts
An oven door that won’t close properly is a problem worth addressing promptly. Beyond the inconvenience, it affects your cooking results, wastes energy, and can pose safety risks. The good news is that most oven door problems have straightforward causes — worn gaskets, faulty hinges, debris buildup, or a stuck latch — and many can be fixed with basic tools and readily available parts.
Start your diagnosis with a visual inspection and the paper test to identify where the seal is failing. Clean the door and hinge areas first, as this alone sometimes solves the problem. If the gasket is worn, replacing it is an affordable and easy fix. For hinge problems, you may need to remove the door, but the process is manageable with patience and the right replacement parts.
If you’ve tried these fixes and the door still won’t close properly, or if you’re dealing with a warped door, stuck latch, or error codes, it’s time to call a professional. Some oven repairs require specialized knowledge and tools, and attempting them without experience can cause further damage or create safety hazards.