Why Washing Machine Hoses Deserve Your Attention
Here is a scenario nobody wants to deal with: you come home from a weekend trip to find your laundry room flooded, water seeping through the floor and into the rooms below. The culprit? A burst washing machine hose. It happens more often than you might think, and the damage can run into thousands of dollars in repairs, mold remediation, and ruined belongings.
The truth is, washing machine hoses are one of the most overlooked components in your home. They sit behind the machine, quietly doing their job, until one day they don’t. In Vancouver, BC, where many homes have laundry setups on upper floors or in basements prone to moisture, a hose failure can be especially devastating.
The good news? Maintaining and replacing your washing machine hoses is straightforward, inexpensive, and something any homeowner can handle. In this guide, we will walk you through everything you need to know, from understanding hose types to recognizing warning signs and performing a replacement yourself.
Types of Washing Machine Hoses
Before we get into maintenance, it helps to know what kind of hoses you are working with. There are three main types of washing machine hoses, and each has different durability and risk levels.
Standard Rubber Hoses
These are the most basic and commonly included hoses that come with new washing machines. They are made of reinforced rubber and typically last about three to five years under normal conditions. While they are functional and affordable, rubber hoses are the most prone to cracking, bulging, and eventually bursting. If your washing machine still has the original rubber hoses from the day it was installed, it is time to take a closer look at their condition.
Reinforced Rubber Hoses
A step up from standard rubber, reinforced rubber hoses feature an added layer of braided rayon or polyester mesh inside the rubber. This extra reinforcement provides better resistance to pressure and reduces the likelihood of sudden failure. They typically last a bit longer than standard rubber hoses, but they still share many of the same vulnerabilities, including cracking and deterioration over time.
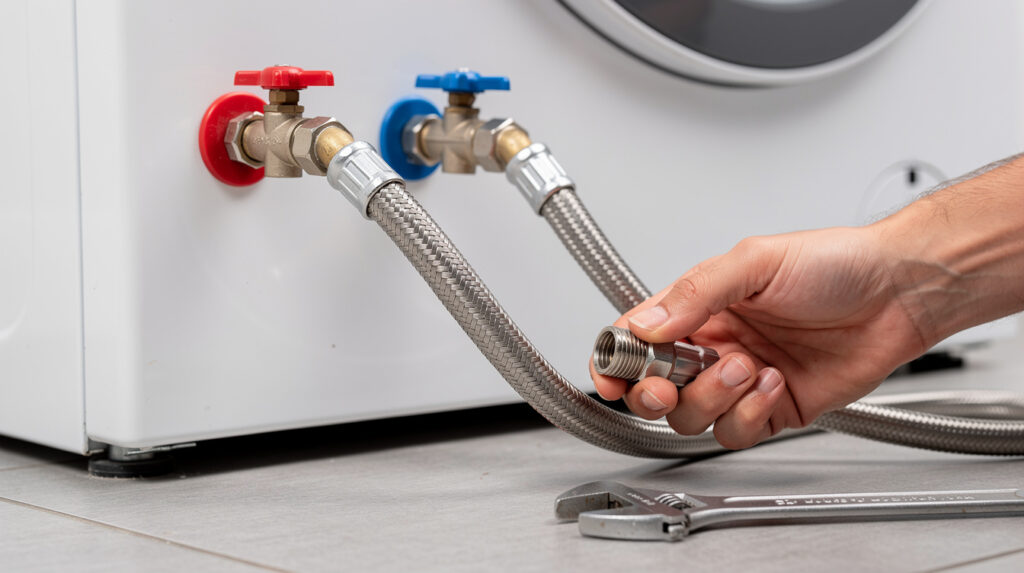
Braided Stainless Steel Hoses
These are the gold standard for washing machine hoses. A braided stainless steel hose features a rubber core surrounded by a woven stainless steel exterior. This design dramatically reduces the risk of bursting and provides superior resistance to kinking, cracking, and pressure damage. While they cost a bit more (usually around twenty to thirty dollars for a pair), the peace of mind they offer is well worth the investment. Most plumbing professionals, including the team at Tech Angels, recommend braided stainless steel hoses for every washing machine installation.
Auto-Shutoff Hoses
For the ultimate in protection, auto-shutoff hoses include a built-in mechanism that detects a sudden surge in water flow (like what happens when a hose bursts) and automatically cuts off the water supply. These are especially valuable if your washing machine is located on an upper floor or if you travel frequently and leave your machine connected while away.
Signs Your Washing Machine Hoses Need Attention
Knowing what to look for is half the battle. Here are the warning signs that your washing machine hoses are deteriorating and may be headed for failure.
Visible Cracks or Dry Rot
Pull your washing machine away from the wall and examine the hoses closely. If you see cracks, splits, or areas where the rubber looks dried out and brittle, replacement is overdue. Rubber naturally degrades over time, and Vancouver’s temperature fluctuations between seasons can accelerate this process.
Bulging or Blistering
A bulge in a washing machine hose is a red flag. It means the inner layers of the hose have weakened, and the water pressure is pushing the outer layer outward. A bulging hose can burst at any moment, so if you spot one, turn off the water supply to the machine immediately and replace the hose right away.
Visible Corrosion on Fittings
The metal fittings where the hoses connect to the machine and the water supply valves can corrode over time, especially in areas with hard water. Look for green or white mineral deposits, rust, or fittings that appear pitted or rough. Corroded fittings can lead to leaks at the connection points even if the hose itself is in good shape.
Slow Leaks or Moisture
Check around the connections and along the length of the hoses for any signs of moisture, dripping, or water stains on the wall or floor behind the machine. Even a tiny drip can indicate a compromised hose or a loose connection that will only get worse over time.
Age of the Hoses
If your hoses are more than five years old, it is time to replace them regardless of how they look. Rubber deteriorates from the inside out, so a hose that looks fine externally could be weakened internally. Most manufacturers and insurance companies recommend replacing washing machine hoses every three to five years as a preventive measure.
How to Inspect Your Washing Machine Hoses
A proper inspection only takes a few minutes and should be done at least twice a year. Here is how to do it thoroughly.
Step 1: Access the Hoses
Carefully pull your washing machine away from the wall. You need enough room to see and feel both hoses along their entire length. If the machine is stacked or in a tight space, you may need a flashlight and a small mirror to get a good look.
Step 2: Visual Inspection
Look at each hose from the connection at the back of the machine all the way to the connection at the water supply valve. Check for cracks, bulges, discoloration, fraying (on braided hoses), or any sign of moisture or mineral deposits.
Step 3: Feel the Hoses
Run your fingers along the length of each hose. A healthy rubber hose should feel flexible but firm. If it feels brittle, stiff, or spongy, it is deteriorating. For braided stainless steel hoses, feel for any areas where the braiding has come loose or where the hose feels kinked.
Step 4: Check the Connections
Gently try to move the fittings at both ends of each hose. They should be snug and secure. If a fitting turns easily or if you see moisture around the connection, it needs to be tightened or the washer inside may need replacement.
Step 5: Inspect the Valves
While you are back there, test the hot and cold water supply valves by turning them off and on. They should turn smoothly. Stiff or stuck valves are a separate issue but an important one, since you need to be able to shut off the water quickly in an emergency.
How to Replace Your Washing Machine Hoses
Replacing washing machine hoses is a manageable DIY project that takes about thirty minutes. Here is the step-by-step process.
What You Will Need
- New washing machine hoses (braided stainless steel recommended)
- Adjustable pliers or a wrench
- A bucket or towels to catch residual water
- Plumber’s tape (also called Teflon tape)
Step 1: Turn Off the Water Supply
Locate the hot and cold water valves behind the washing machine and turn them both off completely. Then run a short cycle on the machine or turn it to a fill cycle briefly to release any pressure in the lines. Finally, unplug the washing machine from the electrical outlet for safety.
Step 2: Disconnect the Old Hoses
Place a bucket or towels under the connections to catch any water that drains out. Using pliers or a wrench, carefully loosen the hose connections at the back of the washing machine first, then at the wall valves. There will be some water in the hoses, so tilt them into the bucket as you remove them.
Step 3: Inspect the Valve Screens
Inside the washing machine’s water inlet connections, you will typically find small mesh screens or filters. These can become clogged with sediment over time, which reduces water flow to the machine. Remove them carefully with needle-nose pliers, clean them under running water, and replace them. If they are damaged, replace them with new screens.
Step 4: Attach the New Hoses
Wrap a few layers of plumber’s tape around the threads of the water supply valves. This helps create a watertight seal. Connect the new hoses to the water supply valves first, then to the back of the washing machine. Most hoses are clearly marked for hot and cold, so make sure you connect them to the correct valves. Hand-tighten the connections, then give them an additional quarter turn with pliers. Do not overtighten, as this can damage the fittings or strip the threads.
Step 5: Check for Leaks
Turn the water supply valves back on slowly and check every connection point for leaks. Let the water run for a minute and inspect all four connections. If you see dripping, tighten the connection slightly. Once everything is dry and secure, push the machine back into position, making sure the hoses are not kinked or pinched.
Preventing Washing Machine Hose Disasters
Replacement is important, but prevention is even better. Here are proven strategies to minimize the risk of a hose-related flood in your home.
Turn Off the Water When Not in Use
This is the single most effective thing you can do. When your washing machine is not running, turn off the hot and cold water supply valves. This removes the constant water pressure from the hoses and dramatically reduces the chance of a burst. Yes, it takes an extra few seconds each time you do laundry, but it can save you from catastrophic water damage.
Never Leave the Machine Running Unattended
If a hose bursts while you are home, you can shut off the water immediately and limit the damage. If it happens while you are at work or on vacation, you could come home to a disaster. Try to only run the washing machine when someone is home.
Install a Washing Machine Pan
A washing machine drain pan sits under the machine and catches any water from small leaks or minor hose failures. It will not save you from a major burst, but it provides an extra layer of protection against slow leaks that might otherwise go unnoticed and cause hidden water damage.
Consider a Water Leak Detector
Smart water leak detectors are inexpensive devices that sit on the floor near your washing machine and alert you (via alarm or smartphone notification) if they detect water. Some models can even connect to an automatic shut-off valve that cuts the water supply if a leak is detected. In a city like Vancouver where many homes have finished basements, this kind of protection is especially valuable.
Schedule Regular Inspections
Add washing machine hose inspections to your home maintenance calendar. Check them every six months and replace them every five years at most. If you want a professional assessment as part of a broader appliance check-up, the technicians at Tech Angels can inspect your hoses and connections during a routine service visit.
The Real Cost of Ignoring Your Washing Machine Hoses
Let us put this in perspective. A pair of high-quality braided stainless steel washing machine hoses costs about twenty-five to forty dollars. Replacing them takes half an hour. Compare that to the cost of water damage from a burst hose, which insurance industry data shows averages around eight thousand dollars or more for a single incident. That figure includes water extraction, drying, repairs to flooring and drywall, and replacement of damaged belongings.
And that is just the financial cost. Water damage also means disruption to your daily life, potential mold growth that can affect your family’s health, and the stress of dealing with insurance claims and contractors. In Vancouver’s real estate market, unaddressed water damage can also significantly affect your home’s value.
Insurance Considerations
Many home insurance policies cover sudden water damage from burst hoses, but they may not cover damage that resulted from lack of maintenance. If your insurer determines that the hoses were old, visibly deteriorated, or that you failed to perform basic maintenance, your claim could be reduced or denied. Keeping your washing machine hoses in good condition is not just practical, it protects your coverage too.
Common Questions About Washing Machine Hoses
Can I use the same hoses for hot and cold water?
Most modern washing machine hoses are rated for both hot and cold water. However, always check the specifications on the packaging. Some hoses are color-coded (red for hot, blue for cold) for convenience, but functionally they are identical. The important thing is that both hoses are in good condition and properly connected to the correct supply lines.
How tight should the connections be?
Hand-tight plus a quarter turn with pliers is the general rule. Overtightening can crack the plastic fittings inside the machine or damage the rubber washers that create the seal. If a connection leaks after tightening, the issue is more likely a worn washer or damaged threads rather than insufficient tightening.
Should I replace both hoses at the same time?
Absolutely. Both hoses are the same age and have experienced the same conditions, so if one is showing signs of wear, the other is likely not far behind. Replacing both at once also means you only have to pull the machine out and deal with the water supply once, saving you time and effort.
What size hoses do I need?
The vast majority of residential washing machines in North America use standard three-quarter-inch hose connections. Measure the distance from your machine to the water supply valves and add a bit of extra length to avoid kinking. Most hoses come in standard lengths of four, five, or six feet. Do not use hoses that are too long, as excess length creates loops that can trap water and increase stress on the connections.
When to Call a Professional
While hose replacement is a DIY-friendly task, there are situations where calling a professional is the smarter move.
- If the water supply valves behind the machine are stuck, corroded, or leaking, a plumber should replace them before you install new hoses.
- If you notice water damage to the wall, floor, or surrounding area, you should address the damage before reconnecting the machine.
- If the washing machine’s water inlet valve (the part inside the machine where the hoses connect) is leaking or damaged, that is an appliance repair issue rather than a simple hose swap.
- If you are uncomfortable working with water connections or if your laundry setup has non-standard plumbing, professional help ensures the job is done safely and correctly.
Maintaining your washing machine hoses is one of those small tasks that makes a huge difference. A few minutes of inspection twice a year and a thirty-dollar hose replacement every few years can save you from one of the most common and costly home water damage events. Take a look behind your machine today, and if those hoses are looking tired, swap them out this weekend. Your future self will thank you.
Related Articles
Explore more appliance care tips from the Tech Angels blog: