Understanding How a Garburator Works
Before you start troubleshooting, it helps to understand what’s happening inside your garburator (also known as a garbage disposal). Despite what many people think, garburators don’t have sharp blades that chop up food like a blender. Instead, they use a spinning flywheel with small impellers that fling food waste against a stationary grind ring. The force breaks the food into tiny particles that wash down the drain with running water.
When you flip the switch and hear a hum but the unit doesn’t spin, it means the motor is getting power and trying to work, but something is preventing the flywheel from turning. That’s actually good news—it means your garburator probably isn’t dead. It’s stuck.
Why a Humming Garburator Is a Problem You Shouldn’t Ignore
It might be tempting to just avoid using the garburator and deal with it later. But a humming disposal that’s left running will overheat. The motor is drawing power and trying to spin, but because it can’t, all that electrical energy turns into heat. This can:
- Trip the internal thermal overload protector (shutting the unit down entirely)
- Burn out the motor permanently if the overload protector fails or is repeatedly tripped
- Create an electrical hazard in extreme cases
So if your garburator is humming, the first thing to do is turn it off. Don’t leave it running while you figure things out.
Safety First: Before You Do Anything
Working on a garburator involves reaching into a drain opening that has a motor and grinding components. Safety isn’t optional here.
- Turn off the garburator switch. Make sure the wall switch is in the OFF position.
- Unplug the unit if it’s plug-connected (check under the sink). If it’s hardwired, flip the circuit breaker that controls it.
- Never put your hand inside the garburator. Even when the power is off, the impellers can be sharp enough to cut you. Use tongs, pliers, or the specialized wrench that came with your unit.
- Keep water off while you’re working on the unit.
With the power confirmed off, you’re ready to diagnose and fix the problem.
The Most Common Causes of a Humming Garburator
1. A Jammed Flywheel
This is by far the most common reason a garburator hums but won’t spin. Something has gotten wedged between the impellers and the grind ring, preventing the flywheel from rotating. Common culprits include:
- Bones (especially small chicken or fish bones)
- Fruit pits (peach, avocado, cherry)
- Broken glass or small utensils that fell in
- Hard food debris that’s built up over time
- A piece of plastic, twist tie, or bottle cap
If you’ve been dealing with other garburator issues too, our comprehensive guide on fixing a garburator that’s not working covers a wider range of problems and solutions.
2. Rust or Corrosion Seizing the Flywheel
If a garburator sits unused for an extended period—say, while you’re on vacation or if it’s in a rarely used kitchen—moisture and food residue can cause rust to form on the flywheel and grind ring. This corrosion can effectively lock the flywheel in place.
3. Worn or Failing Motor Bearings
Over time, the bearings that support the motor shaft can wear out. When this happens, the motor may hum but lack the mechanical ability to spin the flywheel. This is more common in older units (typically 8 years or more) and is often accompanied by other symptoms like intermittent grinding, louder-than-usual operation, or a burning smell.
4. A Failing Capacitor
Some garburator motors use a start capacitor to provide the initial burst of energy needed to get the flywheel spinning. If this capacitor fails, the motor hums because it has power but can’t generate enough torque to start spinning. This is less common in residential units but does happen, particularly with older models.
How to Fix a Jammed Garburator: Step-by-Step
The flywheel jam is the most likely culprit, so let’s start there. Here’s how to free it up:
Method 1: Use the Allen Wrench (Hex Key)
Most garburators have a hex socket on the bottom of the unit, designed specifically for this situation.
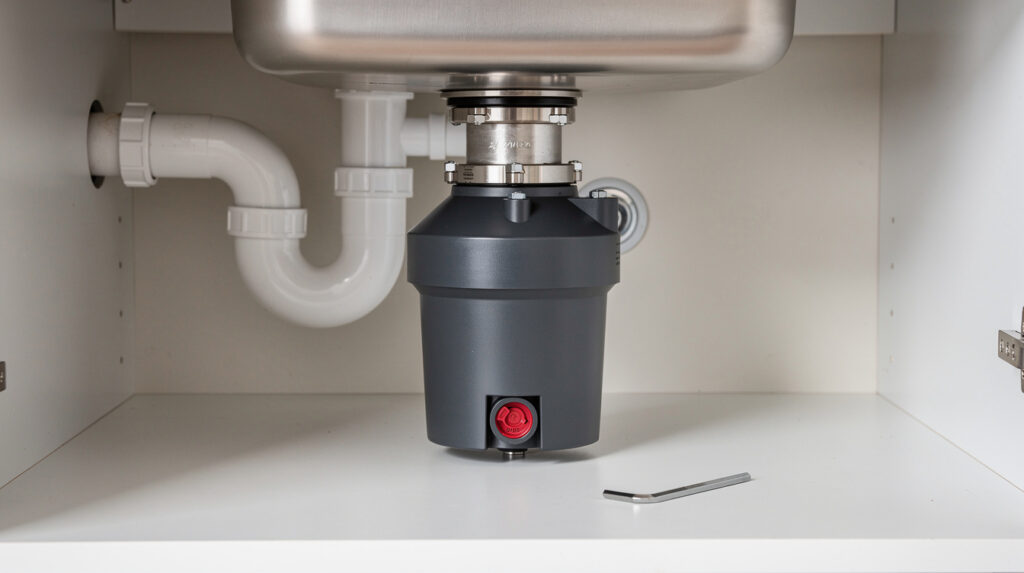
- Find the hex socket. Look at the very bottom of the garburator unit under your sink. You’ll see a small hexagonal hole (usually 1/4 inch).
- Insert an Allen wrench. Use the wrench that came with your garburator, or any 1/4-inch Allen wrench. Insert it into the socket.
- Work it back and forth. Turn the wrench clockwise and counterclockwise. You’re manually rotating the flywheel from the outside. You’ll likely feel resistance at first—that’s the obstruction.
- Keep working it until the wrench turns freely in both directions. This means the jam has been cleared.
- Remove the wrench when done.
Method 2: Use a Wooden Broom Handle or Dowel
If you can’t access the bottom of the unit or don’t have an Allen wrench:
- Insert a wooden broom handle (or thick wooden dowel) into the drain opening from above.
- Position it against one of the impellers on the flywheel.
- Push firmly to try to rotate the flywheel. Work it back and forth.
- Do NOT use a metal tool from above—metal can damage the grind ring and impellers. Wood is firm enough to apply force without causing damage.
Method 3: Remove the Obstruction Directly
If you can see what’s causing the jam:
- Use a flashlight to look into the drain opening and identify the obstruction.
- Use long-handled tongs, needle-nose pliers, or a bent piece of stiff wire to reach in and remove the object.
- Never use your fingers. Even with the power off, the impellers are sharp enough to cause cuts.
- After removing the object, try turning the flywheel with the Allen wrench to make sure it spins freely.
After Clearing the Jam
- Press the reset button. Look on the bottom of the garburator unit for a small red or black button. Press it in. If the thermal overload protector tripped (which is likely if the unit was humming for more than a few seconds), this resets it. For a full walkthrough on resetting appliances, see our guide on how to reset any appliance.
- Restore power (plug it back in or flip the breaker).
- Run cold water into the drain.
- Turn on the garburator. It should spin up normally.
If it spins freely and sounds normal, you’ve fixed the problem. If it still hums, the jam may not be fully cleared—go through the steps again. If it does nothing at all (no hum, no sound), the reset button may need another press, or there could be an electrical issue.
What If the Garburator Still Won’t Spin?
If you’ve cleared the jam, reset the unit, and the garburator still only hums (or makes no sound at all), you’re likely dealing with a more serious issue:
The Motor May Be Burned Out
If the garburator was left humming for an extended period, the motor may have overheated beyond recovery. A burned-out motor typically has a distinct electrical burning smell and will either hum weakly or make no sound at all.
Unfortunately, a burned-out garburator motor isn’t repairable. The unit will need to be replaced. The good news is that garburators are one of the more affordable appliances, and replacement is a relatively straightforward job for a qualified technician.
Worn Bearings Are Preventing Rotation
If the motor sounds like it’s trying harder than usual, or if the flywheel spins but with a grinding feel, the bearings may be worn. This typically happens after many years of use. Like a burned-out motor, worn bearings usually mean replacement rather than repair. If you’re weighing whether to repair or replace, our repair vs. replace cost guide can help you make the right call.
An Electrical Issue
If the garburator makes no sound at all—not even a hum—the problem may not be with the unit itself:
- Check that the unit is plugged in (look under the sink).
- Check the circuit breaker.
- Test the outlet with another appliance to make sure it’s getting power.
- Check the wall switch—switches can fail over time.
Preventing Future Garburator Jams
Once you’ve gotten your garburator spinning again, these habits will help prevent it from jamming in the future:
Know What NOT to Put in Your Garburator
A garburator can handle most soft food waste, but some items are guaranteed to cause problems:
- Bones (anything larger than small fish bones)
- Fruit pits and seeds
- Corn husks and artichoke leaves (fibrous materials wrap around the impellers)
- Grease and cooking oil (these solidify and coat the grinding components)
- Pasta, rice, and bread (they expand with water and create a paste)
- Coffee grounds (they accumulate in drains and cause clogs)
- Eggshells (the membrane can wrap around the impellers)
- Non-food items (obviously, but twist ties, rubber bands, and bottle caps end up in there more often than you’d think)
Always Run Cold Water
Run cold water for about 15 seconds before turning on the garburator, keep it running the entire time the unit is on, and let it run for another 15 seconds after you turn the garburator off. The water helps flush ground-up food particles through the drain line. Use cold water specifically because it keeps any grease in solid form so it gets chopped up rather than coating the drain pipes.
Feed Food Waste Gradually
Don’t dump an entire plate of scraps into the garburator at once. Feed food waste in gradually, giving the unit time to grind and flush each batch before adding more. Think of it as a steady stream, not a dump truck.
Run It Regularly
Even if you don’t have food waste to grind, run the garburator with cold water every few days. This prevents rust and corrosion from building up and keeps the moving parts limber. A garburator that sits idle is more likely to seize up.
Clean It Monthly
Once a month, pour a few ice cubes and a half cup of coarse salt into the garburator and run it with cold water. The ice and salt help scrub the grind ring and impellers, removing buildup. Follow up with a few citrus peels (lemon or orange) to deodorize.
When to Call a Professional
Most garburator jams are a DIY fix with an Allen wrench and a few minutes of patience. But some situations warrant professional help:
- The unit still hums after clearing the jam and resetting — The motor may be damaged or a component may need replacement.
- You smell burning — This suggests motor damage and the unit should not be used until inspected.
- The garburator leaks — Leaking from the bottom of the unit usually indicates a failed internal seal, which means replacement.
- It’s more than 10 years old and having frequent issues — At that age, replacement is usually more cost-effective than ongoing repairs.
- You’re not comfortable working with electrical components — There’s no shame in that. Garburators involve both plumbing and electrical connections, and a professional can handle both safely.
At Tech Angels, we help homeowners across the Vancouver area with garburator repairs and replacements. Whether it’s a stubborn jam or a unit that’s reached the end of its lifespan, we can diagnose the issue and recommend the most cost-effective solution.
Garburator Lifespan: How Long Should Yours Last?
A well-maintained garburator typically lasts 10 to 15 years. Higher-end models with more powerful motors and stainless-steel grind components tend to last longer than budget models with galvanized steel parts.
If your garburator is approaching the 10-year mark and you’re experiencing frequent jams, persistent humming, unusual noises, or leaks, it may be more practical to replace it rather than continue repairing it. Modern garburators are quieter, more powerful, and more efficient than models from a decade ago.
The Bottom Line
A garburator that hums but won’t spin is almost always a jammed flywheel—and in most cases, it’s a fix you can handle yourself in under 10 minutes with an Allen wrench. The key is to act quickly (don’t leave it humming), work safely (always disconnect power first), and address the obstruction methodically.
If the jam is cleared but the unit still won’t work properly, or if you notice signs of motor damage like a burning smell, it’s time to bring in a professional. And once everything is running smoothly again, good habits—running cold water, feeding waste gradually, and knowing what not to grind—will help keep your garburator humming along happily for years to come.