Why Dryer Vent Maintenance Should Be on Your To-Do List
If you have ever pulled a load of laundry from the dryer only to find everything still damp after a full cycle, your dryer vent might be trying to tell you something. A clogged dryer vent is more than just an inconvenience — it is a genuine safety hazard that costs homeowners money every single month in wasted energy. According to the National Fire Protection Association, dryers and washing machines cause an estimated 15,970 home fires each year, and failure to clean the dryer vent is the leading contributing factor.
Here in Vancouver, BC, where rainy weather means heavier laundry loads and more frequent dryer use, keeping your dryer vent clear is especially important. Whether you live in a condo in Yaletown, a townhouse in Burnaby, or a detached home in Kitsilano, this guide will walk you through everything you need to know about cleaning your dryer vent duct properly, safely, and effectively.
How Dryer Vents Work and Why They Clog
Your dryer works by tumbling wet clothes in heated air. As the moisture evaporates from your clothing, it needs somewhere to go. The dryer vent duct is the pathway that carries that hot, moist air — along with tiny lint particles — from the dryer drum to the outside of your home. The vent typically runs from the back of the dryer through a rigid or flexible duct that exits through an exterior wall or roof.
Even with a lint trap catching most of the loose fibers before they enter the vent system, a surprising amount of lint still makes it through. Over time, this lint accumulates along the walls of the duct, at bends and joints, and around the exterior vent flap. The longer the duct run and the more turns it takes, the more opportunities lint has to settle and build up.
Common Reasons Dryer Vents Clog
- Lint bypass: No lint trap catches 100 percent of the fibers. Fine particles slip through every cycle and gradually coat the interior of the vent duct.
- Flexible foil or vinyl ducts: These accordion-style ducts have ridges that trap lint much more easily than smooth rigid ducts. Many older Vancouver homes still have these installed.
- Long duct runs: If your dryer is located in the center of your home or in a basement far from an exterior wall, the longer duct gives lint more surface area to cling to.
- Multiple bends: Every 90-degree turn in your vent duct reduces airflow and creates a spot where lint can accumulate.
- Bird nests and debris: The exterior vent opening can attract birds, rodents, and insects looking for a warm, sheltered spot. Their nests can partially or fully block the vent.
- Crushed or kinked ducts: If the dryer has been pushed too close to the wall, the duct behind it can become compressed, restricting airflow.
Warning Signs Your Dryer Vent Is Blocked
A clogged dryer vent does not always announce itself dramatically. The signs can be subtle at first and gradually worsen. Here is what to watch for:
Your Clothes Take Longer to Dry
This is usually the first sign homeowners notice. If a standard load that used to dry in 45 minutes now takes 60 or 90 minutes, reduced airflow through a clogged vent is the most likely culprit. The hot, moist air cannot escape efficiently, so your clothes sit in a humid environment instead of a dry one.
The Dryer or Laundry Room Feels Unusually Hot
When the vent is blocked, all that heat has nowhere to go. You might notice the top of the dryer feels extremely hot to the touch, or the laundry room itself becomes noticeably warmer than usual during a drying cycle.
A Burning Smell While the Dryer Runs
Lint is highly flammable. When it accumulates near the heating element or within the duct and gets hot enough, it can produce a burning odor. If you ever smell burning while your dryer is running, stop the dryer immediately, disconnect it from power, and inspect the vent system before using it again.
The Exterior Vent Flap Does Not Open Properly
Step outside while your dryer is running and check the exterior vent. The flap should be pushed open by the force of the exhaust air. If it barely moves or stays closed, airflow is restricted — likely by a clog somewhere in the duct.
Visible Lint Around the Dryer or Vent Opening
Lint collecting on the back of the dryer, around the connection point, or around the exterior vent cover is a clear indicator that the system is not exhausting properly and lint is escaping where it should not.
Increased Humidity in the Laundry Area
If you notice condensation on windows, a musty smell, or visible moisture in your laundry room, the moist exhaust air may be backing up into the room instead of venting outside. This is especially concerning in Vancouver’s already damp climate, as it can promote mold growth.
Tools You Will Need for DIY Dryer Vent Cleaning
Before you get started, gather the following tools and supplies. Most of these are available at any Vancouver hardware store or home improvement center:
- Dryer vent cleaning kit: These kits typically include a long, flexible brush and several extension rods that connect together. They are designed to reach deep into the duct and dislodge lint buildup. Most kits work with a standard power drill for rotation.
- Power drill: Used to spin the cleaning brush inside the duct for more effective lint removal.
- Vacuum with a hose attachment: A shop vacuum works best, but a household vacuum with a narrow hose attachment will work for cleaning lint from the dryer connection area and vent opening.
- Screwdriver: You will likely need a Phillips or flathead screwdriver to disconnect the vent duct clamp from the back of the dryer.
- Work gloves: To protect your hands from sharp duct edges and accumulated debris.
- Dust mask: Cleaning a clogged vent releases a lot of fine lint and dust into the air.
- Flashlight: To inspect the inside of the duct and check for remaining buildup.
Step-by-Step Guide to Cleaning Your Dryer Vent
Follow these steps carefully for a thorough and safe dryer vent cleaning. The entire process typically takes 30 to 60 minutes, depending on the length and complexity of your duct system.
Step 1: Unplug the Dryer and Pull It Away from the Wall
Safety first. Disconnect the dryer from its power source. For electric dryers, unplug the cord from the wall outlet. For gas dryers, turn off the gas supply valve behind the dryer. Carefully pull the dryer away from the wall to access the vent connection on the back. Be gentle with the duct — yanking too hard can damage it.
Step 2: Disconnect the Vent Duct from the Dryer
Loosen the clamp or tape that secures the vent duct to the dryer’s exhaust port. Slide the duct off carefully. You will likely see lint buildup right at this connection point — vacuum it up and wipe the area clean.
Step 3: Clean the Duct from the Dryer End
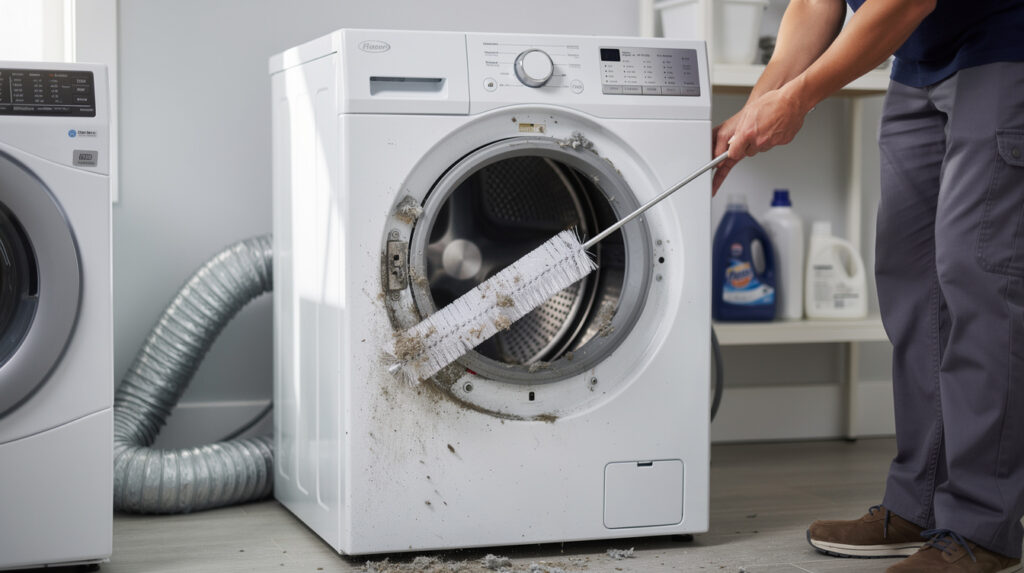
Assemble your dryer vent brush kit by connecting the flexible rods together. Insert the brush into the duct opening at the dryer end. Attach your drill to the end of the rod and run it at a low speed while gently pushing the brush deeper into the duct. The rotating brush will loosen lint from the duct walls. Pull the brush out periodically to remove the accumulated lint.
Work slowly and steadily. If you feel resistance, do not force the brush — you might be hitting a bend in the duct. Gently work through turns rather than pushing hard.
Step 4: Clean from the Exterior Vent Opening
Go outside and locate your dryer vent exit point. Remove the exterior vent cover if possible. Insert the brush from this end and repeat the cleaning process, working the brush in and out while rotating it with the drill. This helps clear any debris, lint, or nesting material that accumulated near the exterior opening.
Step 5: Vacuum Everything
Use your vacuum to clean up all the lint you have dislodged. Vacuum inside both ends of the duct as far as you can reach. Clean the area behind the dryer, the exhaust port on the dryer itself, and the exterior vent opening and cover.
Step 6: Check the Exterior Vent Flap
Make sure the exterior vent flap moves freely and closes properly when the dryer is not running. A stuck or broken flap can let cold air, rain, and pests into your duct system. Replace it if it is damaged or does not close securely.
Step 7: Reconnect Everything
Slide the vent duct back onto the dryer exhaust port and secure the clamp. Push the dryer back into position, being careful not to crush or kink the duct behind it. Leave at least a few inches of space between the dryer and the wall. Plug the dryer back in or turn the gas supply back on.
Step 8: Run a Test Cycle
Run the dryer on a high heat setting for 10 to 15 minutes with no clothes inside. Go outside and verify that you can feel strong, hot airflow coming from the exterior vent. The flap should be pushed fully open by the exhaust. If airflow seems weak, there may still be a blockage deeper in the system that requires professional attention.
How Often Should You Clean Your Dryer Vent?
The general recommendation is to clean your dryer vent at least once a year. However, several factors may mean you need to clean it more frequently:
- Large families with heavy laundry loads: If you run your dryer daily or multiple times per day, clean the vent every six months.
- Pets in the home: Pet hair adds significantly to lint production. Households with dogs or cats should clean vents every six to eight months.
- Long or complex duct runs: If your vent duct is longer than 25 feet or has several bends, it clogs faster and needs more frequent attention.
- Older dryer models: Older dryers may produce more lint and have less efficient lint traps, requiring more frequent vent cleaning.
- You notice any warning signs: Regardless of when you last cleaned the vent, if you notice any of the warning signs mentioned above, clean it right away.
Dryer Vent Cleaning and Fire Prevention
The connection between clogged dryer vents and house fires cannot be overstated. Lint is one of the most flammable materials found in the average home. When lint accumulates in the dryer vent and the dryer generates heat to dry your clothes, you have fuel and an ignition source in close proximity.
The Fire Triangle in Your Laundry Room
Fire requires three things: fuel, heat, and oxygen. A lint-clogged dryer vent provides all three. The lint is the fuel. The dryer’s heating element provides the heat. And air flowing through the vent supplies the oxygen. When the vent is partially blocked, the dryer works harder and gets hotter, increasing the risk that accumulated lint will reach its ignition temperature.
Reducing Your Risk
- Clean the lint trap before or after every single load. This is non-negotiable.
- Clean the dryer vent duct at least once per year, or more often if needed.
- Replace flexible foil or vinyl ducts with rigid or semi-rigid metal ducts, which are safer and resist lint buildup.
- Never run the dryer when you are leaving the house or going to sleep.
- Do not dry items that have been exposed to flammable chemicals, oils, or solvents, even if they have been washed.
- Keep the area around the dryer clean and free of combustible materials.
- Install a smoke detector near your laundry room if there is not one already.
When to Call a Professional for Dryer Vent Cleaning
While DIY dryer vent cleaning is perfectly manageable for many homeowners, there are situations where calling a professional is the smarter choice:
Your Vent Runs Through the Roof
Some homes, particularly those with second-floor or interior laundry rooms, have dryer vents that exit through the roof rather than a side wall. Cleaning these vents requires roof access and specialized equipment. For safety reasons, leave this to the professionals.
The Duct Is Extremely Long or Has Many Bends
If your vent duct is longer than 25 feet or makes more than two 90-degree turns, a standard cleaning kit may not reach the entire length. Professional vent cleaning services have longer, more powerful equipment that can handle complex duct layouts.
You Suspect a Blockage You Cannot Reach
If you have cleaned the vent from both ends and airflow is still poor, there may be a blockage deep within the duct — possibly a bird nest, rodent nest, or a collapsed section of duct. Professionals can use cameras and specialized tools to locate and remove these obstructions.
The Duct Is Damaged
If you notice holes, tears, disconnected sections, or severe kinking in your vent duct, it needs repair or replacement, not just cleaning. A damaged duct can leak exhaust air into your walls or attic, creating moisture and mold problems. The team at Tech Angels can inspect your vent system and advise on whether repair or replacement is the best option.
Choosing the Right Dryer Vent Duct Material
If you discover during cleaning that your duct needs replacement, or if you are installing a new dryer, choosing the right duct material matters for both safety and maintenance.
Rigid Metal Duct
This is the gold standard. Rigid aluminum or galvanized steel ducts have smooth interior walls that resist lint buildup and are the most fire-resistant option. They are more difficult to install around corners but are the safest and most durable choice.
Semi-Rigid Metal Duct
A good compromise between rigid and flexible duct. Semi-rigid aluminum duct can be shaped around corners but has a smoother interior than fully flexible duct, reducing lint accumulation. Most building codes in the Vancouver area accept semi-rigid duct for dryer installations.
Flexible Foil Duct
The accordion-style ridges in flexible foil duct trap lint easily and are more susceptible to crushing and kinking. Many fire safety experts recommend against using this type of duct for dryer vents. If you currently have flexible foil duct, consider upgrading to rigid or semi-rigid metal when you next clean or replace your vent system.
Vinyl or Plastic Duct
These should never be used for dryer vents. They cannot withstand the heat generated by dryers and are a significant fire hazard. If you discover vinyl duct on your dryer, replace it immediately.
Extra Tips for Maintaining Your Dryer Vent
Beyond regular cleaning, these habits will help keep your dryer vent clear and your dryer running efficiently:
- Clean the lint trap every load: This is the single most effective thing you can do to reduce lint in the vent system.
- Wash the lint screen periodically: Dryer sheets can leave a residue on the lint screen that blocks airflow. Wash the screen with warm soapy water every few months and let it dry completely before reinserting.
- Inspect the exterior vent regularly: A quick check every month or so takes only a minute. Make sure the flap opens when the dryer is running and closes when it is not.
- Do not stuff the dryer: Overloading the dryer produces more lint and reduces the efficiency of each drying cycle, meaning more total lint enters the vent over time.
- Ensure adequate clearance behind the dryer: The vent duct needs room to connect without kinking. Keep the dryer at least four inches from the wall.
Keep Your Dryer Safe and Efficient
Cleaning your dryer vent is one of those home maintenance tasks that is easy to forget but genuinely important. A clean vent means faster drying times, lower energy bills, a longer lifespan for your dryer, and most critically, a significantly reduced risk of a dryer fire.
Set a reminder on your phone or calendar to clean your dryer vent at least once a year. If you are not comfortable doing it yourself, or if your vent system is complex, the appliance experts at Tech Angels in Vancouver are always happy to help. A professional dryer vent cleaning is quick, affordable, and gives you peace of mind that your home is safe.
Your dryer works hard for your family — give it the airflow it needs to do its job safely and efficiently.
Related Articles
Explore more appliance care tips from the Tech Angels blog: