Your Kitchen’s Unsung Workhorse
The garburator — or garbage disposal, as it is known in many parts of North America — is one of those kitchen appliances that most people take completely for granted until it stops working. Mounted under your kitchen sink, this compact but powerful device grinds food waste into tiny particles that wash away through your plumbing. When used correctly, a garburator is a convenient, hygienic way to deal with food scraps. When used incorrectly, it becomes a smelly, jammed-up headache that can lead to plumbing problems and expensive repairs.
Whether you just moved into a Vancouver home with a garburator for the first time or you have had one for years and want to make sure you are using it right, this guide covers everything you need to know. We will go through exactly what you should and should not put down your garburator, how to keep it clean and running smoothly, and how to handle common problems when they arise.
What Can Go in Your Garburator
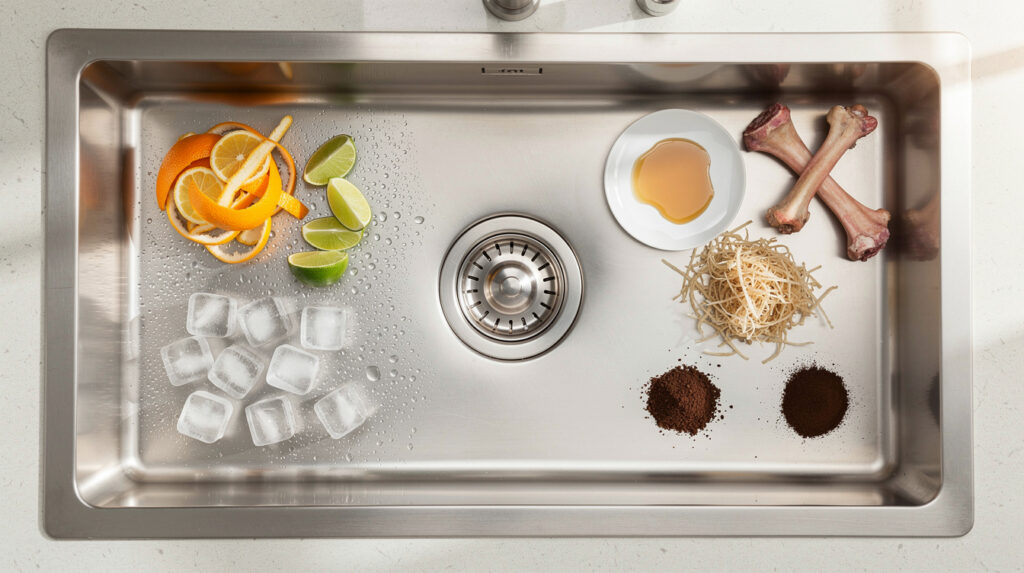
A garburator is designed to handle small amounts of soft food waste — the scraps left on plates and cutting boards after meal prep and dining. Here is what is safe to put down your garburator:
Soft Fruits and Vegetables
Most soft fruits and vegetables are perfectly fine for the garburator. Think apple peels, banana pieces, berries, cooked vegetables, lettuce, soft squash, tomatoes, cucumbers, and grapes. These break down easily and flush through the plumbing without issues.
Small Amounts of Cooked Food
Leftover cooked vegetables, rice (small amounts), pasta (small amounts), and soft cooked meat scraps can go into the garburator. The key phrase here is “small amounts.” Your garburator is meant for plate scrapings, not disposing of entire meals.
Citrus Peels
Small pieces of lemon, lime, and orange peel are not only safe for the garburator — they are actually beneficial. Citrus peels help clean the grinding components and leave your garburator smelling fresh. Toss a few small pieces down the disposal every week or two as a natural deodorizer.
Ice Cubes
Running ice cubes through the garburator is a great maintenance trick. The ice helps knock loose any buildup on the grinding components without damaging them. Throw a handful of ice cubes into the disposal and run it with cold water for a quick cleaning.
Egg Shells (In Moderation)
There is some debate about egg shells. A few shells at a time are generally fine and can help clean the grinding chamber. However, the thin membrane inside the shell can wrap around the grinding components, so do not put large quantities down at once. One or two shells at a time is the safe approach.
Small Bones
Small chicken or fish bones in small quantities are acceptable for most garburators, especially higher-powered models. The bones actually help scour the grinding chamber. However, this does not mean you should put an entire chicken carcass down the disposal — just the occasional small bone that ends up on a plate.
What Should Never Go in Your Garburator
This is the list that trips up most homeowners. Many common food items that seem like they should be fine are actually terrible for your garburator and plumbing system. Memorize this list and you will avoid the vast majority of garburator problems.
Grease, Oil, and Fat
This is the single biggest garburator and plumbing rule: never pour grease, cooking oil, or liquid fat down the drain, with or without the garburator running. Grease is liquid when hot but solidifies as it cools inside your pipes, coating the walls and gradually narrowing the pipe diameter. Over time, grease buildup leads to clogs that can affect not just your kitchen sink but your entire household drain system.
Instead, pour cooled grease into a disposable container (an old can or jar) and throw it in the trash. For bacon grease and other cooking fats, let them solidify in the pan and wipe them out with a paper towel before washing.
Fibrous Vegetables
Vegetables with long, stringy fibers are a garburator’s worst enemy. The fibers wrap around the grinding components like thread around a spool, tangling the mechanism and potentially burning out the motor. Avoid putting these down the garburator:
- Celery
- Asparagus
- Corn husks and corn silk
- Artichokes
- Rhubarb
- Green onion tops
- Pea pods
Starchy Foods in Large Quantities
Pasta, rice, oats, and potatoes expand when they absorb water and can form a thick, starchy paste that clogs the drain. A few stray noodles from a plate are fine, but dumping a pot of leftover spaghetti down the garburator is asking for trouble. The starchy paste can also coat the grinding components and reduce their effectiveness.
Potato peels are particularly problematic. The starch in potato peels forms a gluey paste that can jam the garburator and create stubborn clogs in the drain pipe.
Coffee Grounds
Coffee grounds might seem harmless because they are so small, but they are one of the most common causes of drain clogs. While the garburator handles them fine, the grounds accumulate in the drain pipe and form a dense, sludgy mass that restricts water flow. Compost your coffee grounds or throw them in the trash instead.
Large Bones
While small chicken and fish bones are generally acceptable, large bones from beef, pork, or lamb are too hard and dense for the garburator to grind effectively. They can damage the grinding components, jam the mechanism, and dull the grind ring. Throw large bones in the trash or compost them.
Fruit Pits and Hard Seeds
Peach pits, avocado pits, cherry pits, and other hard seeds are simply too hard for the garburator. They bounce around the grinding chamber without breaking down and can jam or damage the mechanism. Always discard pits and hard seeds in the trash.
Seafood Shells
Shrimp shells, crab shells, lobster shells, clam shells, and oyster shells are too hard and can damage the garburator’s grinding components. Some people believe that small shrimp shells are acceptable, but it is safer to throw all shells in the trash or compost.
Non-Food Items
This should go without saying, but never put non-food items down the garburator. This includes paper, plastic, glass, metal (other than the silverware that occasionally falls in by accident), rubber bands, twist ties, cigarette butts, or any other non-food material. These items can jam the mechanism, damage the grinding components, or cause clogs in the drain system.
Paint, Chemicals, and Harsh Cleaners
Your garburator and drain system are not designed to handle chemical waste. Never pour paint, paint thinner, solvents, bleach, drain cleaner, or other harsh chemicals down the garburator. These can damage the garburator’s components, harm your plumbing, and pollute the water treatment system. In Vancouver, improper disposal of chemicals can also violate municipal bylaws.
The Cold Water Rule
If there is one operating tip that makes the biggest difference in garburator performance and longevity, it is this: always use cold water when running the garburator. Always.
Why Cold Water and Not Hot?
Cold water solidifies any fats or grease that may be mixed in with your food waste, allowing the garburator to grind them into small particles that flush through the plumbing. Hot water melts grease and fat, allowing it to flow past the garburator in liquid form — but then it solidifies farther down in your drain pipe, coating the pipe walls and eventually causing clogs.
The Correct Operating Procedure
Follow this sequence every time you use the garburator:
- Turn on a strong flow of cold water.
- Turn on the garburator.
- Feed food waste into the garburator gradually — do not stuff it all in at once.
- Let the garburator run until all the food waste has been ground (you will hear the grinding tone change when the food is gone).
- Let the cold water continue to run for 15 to 20 seconds after the grinding is complete to flush all particles through the drain pipe.
- Turn off the garburator.
- Turn off the water.
Running water before, during, and after grinding is essential. The water carries the ground particles through the plumbing. Running the garburator without water — or without enough water — leaves ground food paste sitting in the drain pipe, where it can harden and cause blockages.
How to Clean Your Garburator
A clean garburator is a happy garburator. Regular cleaning prevents odor, buildup, and bacterial growth. Here are several methods you can use, from the quick and easy to the thorough deep clean.
The Ice and Salt Method
Pour two cups of ice cubes into the garburator, followed by one cup of coarse salt (rock salt or kosher salt works great). Run the garburator with cold water for about 30 seconds. The ice and salt work together to scour the grinding components and chamber walls, knocking loose stuck-on food residue.
The Citrus Fresh Method
Cut a lemon or lime into small pieces and drop them into the garburator one at a time with cold running water. The citrus oil and juice clean the grinding components and leave a fresh, clean scent. This is a great follow-up to the ice and salt method.
The Baking Soda and Vinegar Deep Clean
For a more thorough cleaning, especially if you notice persistent odor:
- Pour half a cup of baking soda down the garburator.
- Follow with one cup of white vinegar.
- Let the mixture fizz and work for 10 to 15 minutes.
- Flush with hot water (this is one of the few times hot water is appropriate — you want to rinse away the cleaning solution and the loosened grime).
- Follow with cold water and run the garburator briefly to clear everything through.
Cleaning the Splash Guard
The rubber splash guard (the black rubber flaps at the drain opening) is a major source of garburator odor. Food particles accumulate on the underside of these flaps where you cannot see them. Lift each flap and scrub the underside with an old toothbrush and dish soap. You will likely be surprised by what comes off. Do this every week or two.
What NOT to Use for Cleaning
Never use chemical drain cleaners in a garburator. These caustic products can corrode the garburator’s metal components and shorten its lifespan. They are also harmful to the environment and unnecessary when the mechanical methods above are so effective. Never put your hand inside the garburator, even when it is off — the grinding components are sharp. Use tongs, pliers, or a brush to clean and retrieve items from inside.
How to Avoid Garburator Jams
A jammed garburator is the most common problem homeowners face. Here is how to prevent jams and what to do when they happen.
Prevention Tips
- Feed waste gradually: Do not stuff a large quantity of food into the garburator all at once. Feed it in slowly, letting the grinding components do their work before adding more.
- Cut large items into smaller pieces: If you have large peels or food scraps, cut them into smaller pieces before putting them in the garburator.
- Run water generously: Always use a strong, steady stream of cold water — not a trickle. The water helps move food through the system and prevents buildup.
- Run the garburator regularly: Even if you do not have food waste to grind, run the garburator with water for a few seconds every few days. This prevents rust, corrosion, and food from hardening on the components. It also ensures the moving parts stay lubricated.
- Stay away from the items on the “never” list: Fibrous vegetables, grease, and starchy foods are the most common causes of jams.
What to Do When Your Garburator Jams
If the garburator hums but the grinding plate does not spin, or if it simply will not turn on, here is how to unjam it:
Step 1: Turn off the garburator immediately. Do not keep it running while jammed — the motor can overheat and burn out.
Step 2: Never put your hand inside the garburator. This is extremely important for your safety.
Step 3: Look under the sink at the bottom of the garburator unit. Most garburators have a hex socket (Allen wrench hole) at the very bottom center. Insert the Allen wrench that came with your garburator (usually a 1/4-inch hex wrench) and manually turn the grinding plate back and forth. This usually frees the jam.
Step 4: If you do not have the wrench, use a wooden broom handle or wooden spoon inserted from the top (through the drain opening) to try to manually rotate the grinding plate.
Step 5: Once freed, remove any visible debris from the drain opening using tongs or pliers.
Step 6: Press the reset button on the bottom of the garburator unit. When the motor overheats from a jam, the thermal overload trips and needs to be reset by pressing this small red or black button.
Step 7: Turn on cold water and try the garburator again. It should run normally.
Garburator Maintenance Schedule
Keep your garburator in top condition with this simple maintenance schedule:
Weekly
- Clean the splash guard underside with a toothbrush and dish soap.
- Run ice cubes through the garburator to clean the grinding components.
Biweekly
- Grind citrus peels to freshen the garburator and break down grease.
Monthly
- Perform the baking soda and vinegar deep clean.
- Check under the sink for any signs of leaks from the garburator unit or its connections.
Annually
- Inspect all connections for tightness and signs of corrosion.
- Check the splash guard for wear — if it is cracked, torn, or no longer provides a good seal, replace it.
When to Call a Professional for Garburator Help
Most garburator issues can be handled at home, but some problems require professional expertise:
The Garburator Leaks
Leaks can originate from several points — the sink flange where the garburator connects to the sink, the dishwasher connection, the drain connection, or the unit itself. A leak from the unit body usually means a crack in the housing, which typically requires replacement rather than repair.
The Garburator Will Not Turn On
If the garburator does not hum, does not respond to the reset button, and the electrical supply is confirmed to be working, the motor may have failed. Garburator motors can burn out from repeated jams, age, or electrical issues.
Persistent Clogs Despite Proper Use
If you are using your garburator correctly and still experiencing frequent clogs, the problem may be in the drain plumbing beyond the garburator rather than the unit itself. Older Vancouver homes sometimes have narrower drain pipes or pipe configurations that are more prone to clogging.
Excessive Vibration or Noise
While all garburators make noise, excessive vibration, metal-on-metal grinding, or new sounds that were not present before can indicate worn grinding components, loose mounting, or internal damage. A professional can diagnose whether repair or replacement is the better option.
The team at Tech Angels has extensive experience with garburator repair and replacement. Whether your disposal needs a simple fix or a full replacement, we can help you get your kitchen sink working properly again.
How Long Does a Garburator Last?
A well-maintained garburator typically lasts 8 to 15 years, depending on the quality of the unit, how frequently it is used, and how well it is maintained. Signs that your garburator may be nearing the end of its life include:
- Frequent jams despite proper use
- Food takes much longer to grind than it used to
- Persistent odor that does not respond to cleaning
- Frequent need to reset the overload button
- Visible rust or corrosion
- Leaks from the unit body
When replacement is needed, consider upgrading to a higher-powered model with better noise insulation and a larger grinding chamber. The investment pays off in quieter operation and better grinding performance.
Use It Right and It Will Serve You Well
A garburator is a genuinely useful kitchen appliance when you treat it with a little respect and knowledge. Follow the dos and don’ts in this guide, stick to the cold water rule, clean it regularly, and feed it gradually, and your garburator will reliably handle your food waste for years. Ignore these guidelines, and you will find yourself dealing with jams, clogs, odors, and eventually a dead motor.
The rules are simple enough that everyone in the household — including kids old enough to help with dishes — should know the basics. A quick conversation about what can and cannot go down the garburator saves a lot of plumbing headaches down the road.
Keep it clean, keep it cold, and keep the wrong things out of it. That is the recipe for a long-lasting, trouble-free garburator.
Related Articles
Explore more appliance care tips from the Tech Angels blog: